【VB.NET】Windowsのタスクバーを非表示にした
はじめに
とあるアプリの仕様上、Windowsのタスクバーを非表示にしたくなった。
調べてみると、意外とコーディング方法がなく(XP時代のコードがでてきた)、また参考にしたコードもちょっと問題があった。
一応やりたいことが出来たのでメモ書き
環境
- VB.NET
- .NET Framework (バージョン忘れた・・・思い出し次第修正予定)
- WPF
実装
以下のサイトを参考にした。
Windowsのタスクバーの表示・非表示をAPIで制御する方法。(自動的に隠す隠さないもあるよ)
参考にしたサイトのものをそのまま使用すると、Windowsのスタートボタン(?)が残っていた
「WinLister」というツールを使用したところ、スタートボタンのウィンドウクラス名が「Button」っぽい
なので、「Shell_TrayWnd」と「Button」を非表示にするようにしたところ、タスクバーがちゃんと消えるようになった
以下、タスクバーを非表示にするクラス
Imports System.Runtime.InteropServices


Class TaskbarControl


    ''' <summary>ウィンドウクラス名を格納しておく</summary>
    Private windowClasses As String() = New String() {"Shell_TrayWnd", "Button"}

    ''' <summary>タスクバー非表示前の状態保存用変数</summary>
    Private lastStatus As Dictionary(Of IntPtr, ABMsg) = New Dictionary(Of IntPtr, ABMsg)


    ''' <summary>タスクバーを表示します。</summary>
    Public Sub Show()
        SetVisible(True)
    End Sub


    ''' <summary>タスクバーを非表示にします。</summary>
    Public Sub Hidden()
        SetVisible(False)
    End Sub


    ''' <summary>タスクバーの表示・非表示切り替え</summary>
    '''
    ''' <param name="visible">trueのとき表示する</param>
    Private Sub SetVisible(visible As Boolean)
        For Each className As String In windowClasses
            Dim hWnd As IntPtr = FindWindow(className, Nothing)

            If hWnd = 0 Then
                Continue For
            End If

            ' 非表示にする際は、「表示」している状態のAutoHideのOn・Offを同じ設定にするため、
            ' メンバ変数に現在の状態を保存する。非表示から表示状態にするときは、保存していた
            ' 前回値を設定する。
            Dim appbarMessage As ABMsg
            If visible Then
                If Me.lastStatus.ContainsKey(hWnd) Then
                    appbarMessage = Me.lastStatus(hWnd)
                Else
                    appbarMessage = ABMsg.ABM_NEW
                End If
            Else
                Dim status As ABMsg = Me.GetAppBarStatus(hWnd)
                Me.lastStatus.Add(hWnd, status)
                appbarMessage = ABMsg.ABM_REMOVE
            End If

            Me.SetAppBarStatus(hWnd, ABMsg.ABM_ACTIVATE)

            Dim command As Integer = If(visible, WindowCmd.Show, WindowCmd.Hide)
            ShowWindow(hWnd, command)
        Next

        If visible Then
            Me.lastStatus.Clear()
        End If

    End Sub


    ''' <summary>タスクバーの状態を取得</summary>
    '''
    ''' <param name="hWnd">ウィンドウハンドル</param>
    ''' <returns>タスクバーの表示状態</returns>
    Private Function GetAppBarStatus(hWnd As IntPtr) As ABMsg
        Dim pData As New APPBARDATA()
        pData.cbSize = Marshal.SizeOf(pData)
        pData.hWnd = hWnd

        SHAppBarMessage(ABMsg.ABM_GETSTATE, pData)

        Return pData.lParam
    End Function


    ''' <summary>タスクバーの状態を設定</summary>
    '''
    ''' <param name="hWnd">ウィンドウハンドル</param>
    ''' <param name="status">AppBarメッセージ</param>
    Private Sub SetAppBarStatus(hWnd As IntPtr, status As ABMsg)
        Dim pData As New APPBARDATA()
        pData.cbSize = Marshal.SizeOf(pData)
        pData.hWnd = hWnd

        pData.lParam = status
        SHAppBarMessage(ABMsg.ABM_SETSTATE, pData)
    End Sub


    ''' <summary>Sends an appbar message to the system.</summary>
    Private Enum ABMsg As Integer
        ''' <summary>Registers a new appbar and specifies the message identifier that the system should use to send notification messages to the appbar.</summary>
        ABM_NEW = 0

        ''' <summary>Unregisters an appbar, removing the bar from the system's internal list.</summary>
        ABM_REMOVE = 1

        ''' <summary>Requests a size and screen position for an appbar.</summary>
        ABM_QUERYPOS = 2

        ''' <summary>Sets the size and screen position of an appbar.</summary>
        ABM_SETPOS = 3

        ''' <summary>Retrieves the autohide and always-on-top states of the Windows taskbar.</summary>
        ABM_GETSTATE = 4

        ''' <summary>Retrieves the bounding rectangle of the Windows taskbar. </summary>
        '''
        ''' <remarks>
        ''' Note that this applies only to the system taskbar.
        ''' Other objects, particularly toolbars supplied with third-party software, also can be present.
        ''' As a result, some of the screen area not covered by the Windows taskbar might not be visible to the user.
        ''' To retrieve the area of the screen not covered by both the taskbar
        ''' and other app bars—the working area available to your application—,
        ''' use the GetMonitorInfo function.
        ''' </remarks>
        ABM_GETTASKBARPOS = 5

        ''' <summary>Notifies the system to activate or deactivate an appbar.</summary>
        '''
        ''' <remarks>
        ''' The lParam member of the APPBARDATA pointed to by pData is set to TRUE to activate or FALSE to deactivate.
        ''' </remarks>
        ABM_ACTIVATE = 6

        ''' <summary>Retrieves the handle to the autohide appbar associated with a particular edge of the screen.</summary>
        ABM_GETAUTOHIDEBAR = 7

        ''' <summary>Registers or unregisters an autohide appbar for an edge of the screen.</summary>
        ABM_SETAUTOHIDEBAR = 8

        ''' <summary>Notifies the system when an appbar's position has changed.</summary>
        ABM_WINDOWPOSCHANGED = 9

        ''' <summary>Sets the state of the appbar's autohide and always-on-top attributes.</summary>
        '''
        ''' <remarks>
        ''' Windows XP and later
        ''' </remarks>
        ABM_SETSTATE = 10

        ''' <summary>Retrieves the handle to the autohide appbar associated with a particular edge of a particular monitor.</summary>
        '''
        ''' <remarks>
        ''' Windows XP and later
        ''' </remarks>
        ABM_GETAUTOHIDEBAREX = 11

        ''' <summary>Registers or unregisters an autohide appbar for an edge of a particular monitor.</summary>
        '''
        ''' <remarks>
        ''' Windows XP and later
        ''' </remarks>
        ABM_SETAUTOHIDEBAREX = 12
    End Enum


    ''' <summary>Contains information about a system appbar message.</summary>
    '''
    ''' <remarks>
    ''' http://www.geocities.jp/katayama_hirofumi_mz/imehackerz/ja/APPBARDATA.html
    ''' </remarks>
    <StructLayout(LayoutKind.Sequential)>
    Private Structure APPBARDATA
        ''' <summary>The size of the structure, in bytes.</summary>
        Public cbSize As Integer

        ''' <summary>The handle to the appbar window.</summary>
        '''
        ''' <remarks>
        ''' Not all messages use this member. See the individual message page to see if you need to provide an hWind value.
        ''' </remarks>
        Public hWnd As IntPtr

        ''' <summary>An application-defined message identifier.</summary>
        '''
        ''' <remarks>
        ''' The application uses the specified identifier for notification messages
        ''' that it sends to the appbar identified by the hWnd member.
        ''' This member is used when sending the ABM_NEW message.
        ''' </remarks>
        Public uCallbackMessage As UInteger

        ''' <summary>A value that specifies an edge of the screen.</summary>
        '''
        ''' <remarks>
        ''' This member is used when sending one of these messages:<br/>
        ''' <list type="bullet">
        '''   <item>ABM_GETAUTOHIDEBAR</item>
        '''   <item>ABM_SETAUTOHIDEBAR</item>
        '''   <item>ABM_GETAUTOHIDEBAREX</item>
        '''   <item>ABM_SETAUTOHIDEBAREX</item>
        '''   <item>ABM_QUERYPOS</item>
        '''   <item>ABM_SETPOS</item>
        ''' </list>
        ''' </remarks>
        Public uEdge As ABEdge

        ''' <summary>A RECT structure</summary>
        '''
        ''' <remarks>
        ''' A RECT structure whose use varies depending on the message:<br/>
        ''' ABM_GETTASKBARPOS、ABM_QUERYPOS、ABM_SETPOS:
        '''     The bounding rectangle, in screen coordinates, of an appbar or the Windows taskbar.
        ''' ABM_GETAUTOHIDEBAREX、ABM_SETAUTOHIDEBAREX
        '''     The monitor on which the operation is being performed. This information can be retrieved through the GetMonitorInfo function.
        ''' </remarks>
        Public rc As RECT

        ''' <summary>A message-dependent value.</summary>
        '''
        ''' <remarks>
        ''' This member is used with these messages:<br/>
        ''' <list type="bullet">
        '''   <item>ABM_SETAUTOHIDEBAR</item>
        '''   <item>ABM_SETAUTOHIDEBAREX</item>
        '''   <item>ABM_SETSTATE</item>
        ''' </list>
        ''' See the individual message pages for details.
        ''' </remarks>
        Public lParam As Integer
    End Structure


    ''' <summary>A value that specifies an edge of the screen.</summary>
    Private Enum ABEdge As Integer
        ''' <summary>Left edge.</summary>
        ABE_LEFT = 0

        ''' <summary>Top edge.</summary>
        ABE_TOP = 1

        ''' <summary>Right edge.</summary>
        ABE_RIGHT = 2

        ''' <summary>Bottom edge.</summary>
        ABE_BOTTOM = 3
    End Enum


    ''' <summary>the coordinates of the upper-left and lower-right corners of a rectangle.</summary>
    <StructLayout(LayoutKind.Sequential)>
    Private Structure RECT
        ''' <summary>The x-coordinate of the upper-left corner of the rectangle.</summary>
        Public left As Integer

        ''' <summary>The y-coordinate of the upper-left corner of the rectangle.</summary>
        Public top As Integer

        ''' <summary>The x-coordinate of the lower-right corner of the rectangle.</summary>
        Public right As Integer

        ''' <summary>The y-coordinate of the lower-right corner of the rectangle.</summary>
        Public bottom As Integer
    End Structure


    ''' <summary>ウィンドウの表示方法</summary>
    '''
    ''' <remarks>
    ''' https://msdn.microsoft.com/ja-jp/library/cc411211.aspx
    ''' </remarks>
    Private Enum WindowCmd As Integer
        ''' <summary>表示</summary>
        Hide = 0
        ''' <summary>非表示</summary>
        Show = 5
    End Enum


    ''' <summary>システムにAppBarメッセージを送信する。</summary>
    '''
    ''' <remarks>
    ''' https://msdn.microsoft.com/ja-jp/library/bb762108(v=vs.85).aspx
    ''' </remarks>
    '''
    ''' <param name="dwMessage">AppBarメッセージ値</param>
    ''' <param name="pData">送信パラメータ</param>
    '''
    ''' <returns>メッセージに依存した値</returns>
    <DllImport("shell32.dll", CallingConvention:=CallingConvention.StdCall)>
    Private Shared Function SHAppBarMessage(dwMessage As ABMsg, ByRef pData As APPBARDATA) As Integer
    End Function


    ''' <summary>指定されたウィンドウの表示状態を設定します。</summary>
    '''
    ''' <remarks>
    ''' https://msdn.microsoft.com/ja-jp/library/cc411211.aspx
    ''' </remarks>
    '''
    ''' <param name="hWnd">ウィンドウハンドル</param>
    ''' <param name="nCmdShow">表示状態</param>
    '''
    ''' <returns>ウィンドウが以前から表示されていた場合は、0 以外の値</returns>
    <DllImport("user32.dll", EntryPoint:="ShowWindow")>
    Private Shared Function ShowWindow(hWnd As IntPtr, nCmdShow As Integer) As Integer
    End Function


    ''' <summary>指定された文字列と一致するクラス名とウィンドウ名を持つ親を持たないウィンドウのハンドルを返します</summary>
    '''
    ''' <remarks>
    ''' https://msdn.microsoft.com/ja-jp/library/cc364634.aspx
    ''' </remarks>
    '''
    ''' <param name="lpClassName">クラス名</param>
    ''' <param name="lpWindowName">ウィンドウ名</param>
    '''
    ''' <returns>関数が成功すると、指定したクラス名とウィンドウ名を持つウィンドウのハンドルが返ります</returns>
    <DllImport("user32.dll", EntryPoint:="FindWindow")>
    Private Shared Function FindWindow(lpClassName As String, lpWindowName As String) As Integer
    End Function


End Class
使用例
使用方法はこんな感じ
Class MainWindow

    Private taskbarController As TaskbarControl = New TaskbarControl()

    ''' <summary>画面表示時に実行</summary>
    Private Sub Grid_Loaded(sender As Object, e As RoutedEventArgs)
        Me.Left = 0
        Me.Top = 0
        Me.Width = SystemParameters.PrimaryScreenWidth
        Me.Height = SystemParameters.PrimaryScreenHeight
        Me.Topmost = True
        taskbarController.Hidden()
    End Sub

    ''' <summary>アプリ終了時に実行</summary>
    Private Sub Window_Closing(sender As Object, e As ComponentModel.CancelEventArgs)
        taskbarController.Show()
    End Sub

End Class
動作確認はWindows7(64bit)、Windows10(うろ覚え・・・)
C#版も作ったけど、タスクバーの復帰がうまくいかなかった・・・
具体的には、タスクバーを「自動的に隠す」にした後に、非表示→表示と動作させると「自動的に隠す」の設定が消えてる・・・VBだと問題なかったんだけど
C#版で作ったことはなかったことにしよう
Raspberry PiでRAID1付きのNASを構築してみた
はじめに
最近、音楽系の趣味(?)が増えたので、CDレンタルするようになった
タイミングよくTUTAYAで旧作10枚で1080円というキャンペーンをやっているので、一年も経たないうちに結構増えてしまった
なのでPCが壊れて音源が無くなるのは非常に困るのでNASが欲しくなった
昔会社のXPだったPCをもらって、CentOSをインストールしてNASとして構築したけど、起動が遅い・デカイ・火事が怖い、で付けっぱなしにしにくいので全然使ってなかった。
市販のNASは高いから手を出しにくい
ふと全然使っていないRaspberryPiでNAS構築できるじゃね?って思った
あと前々からOSが入っているディスクと保存領域を物理的に分けたいとも考えていたので、RaspberryPiで出来たら万々歳
なのでいろんなサイトを参考にして構築してみた
RaspberryPiでNAS構築する際は以下のサイトが非常に参考になりました。
目次
構成
- Raspberry Pi 2 Model 2
- OS:RASPBIAN 8.0
- HDD 2.0TB × 2
- HDDケース:フリーダム FHC-361BK
HDDケースは6分間以上使用していない・接続しているPCの電源が切れると電源が切れるものを購入
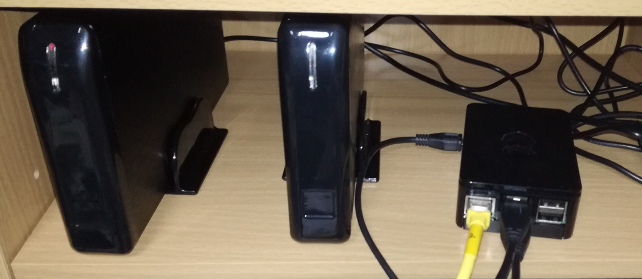
結局こんな感じになった

1. GUIログインの無効化
NAS用途で基本画面を使用しないし、できるだけ動作を軽くしたいのでGUIログインを無効にする。
initかsystemdのデフォルトを変えれば良いと思っていたけど微妙に違うらしい
GUIログインの無効化については以下のサイトを参考にした
以下のコマンドを実行
# systemctl set-default multi-user.target
# ln -fs /lib/systemd/system/getty@.service /etc/systemd/system/getty.target.wants/getty@tty1.service
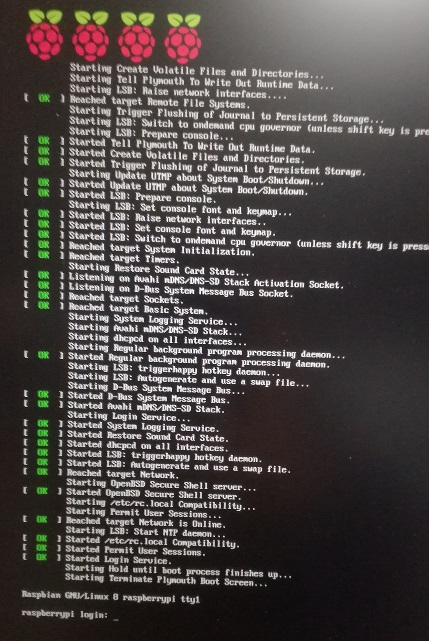
再起動するとCUIログイン画面が表示されるようになった

2. パーティションの再構築
2-1. 現在のパーティションの確認
「fdisk -l」コマンドで、HDDのデバイスファイルを確認
# fdisk -l
・
・
・
Disk /dev/sda: 1.8 TiB, 2000398934016 bytes, 3907029168 sectors
Units: sectors of 1 * 512 = 512 bytes
Sector size (logical/physical): 512 bytes / 512 bytes
I/O size (minimum/optimal): 512 bytes / 512 bytes
Disklabel type: dos
Disk identifier: 0x00050a08

Device     Boot   Start        End    Sectors  Size Id Type
/dev/sda1  *       2048    1050623    1048576  512M fd Linux raid autodetect
/dev/sda2       1050624 3907028991 3905978368  1.8T fd Linux raid autodetect

Disk /dev/sdb: 1.8 TiB, 2000398934016 bytes, 3907029168 sectors
Units: sectors of 1 * 512 = 512 bytes
Sector size (logical/physical): 512 bytes / 512 bytes
I/O size (minimum/optimal): 512 bytes / 512 bytes
Disklabel type: dos
Disk identifier: 0x000ac0eb

Device     Boot   Start        End    Sectors  Size Id Type
/dev/sdb1  *       2048    1050623    1048576  512M fd Linux raid autodetect
/dev/sdb2       1050624 3907028991 3905978368  1.8T fd Linux raid autodetect
昔の環境(CentOS)からそのまま持ってきた
2台のHDDがそれぞれ「/dev/sda」・「/dev/sdb」で接続されており、パーティションがどちらも2つ作成されている(/dev/sda1と/dev/sda2)
なのでパーティションを削除する
2-2. パーティションの削除
まずは「/dev/sda」のパーティションを削除
# fdisk /dev/sda

### 【Command (m for help):】でdを入力し、パーティションを削除
Command (m for help): d
Partition number (1,2, default 2): 2

Partition 2 has been deleted.

### 【Command (m for help):】でdを入力し、パーティションを削除
Command (m for help): d
Selected partition 1
Partition 1 has been deleted.

### 【Command (m for help):】でpを入力し、パーティションテーブルを確認(消したので何も表示されない)
Command (m for help): p
Disk /dev/sda: 1.8 TiB, 2000398934016 bytes, 3907029168 sectors
Units: sectors of 1 * 512 = 512 bytes
Sector size (logical/physical): 512 bytes / 512 bytes
I/O size (minimum/optimal): 512 bytes / 512 bytes
Disklabel type: dos
Disk identifier: 0x00050a08
続けてパーティションの作成
2-3. 新規パーティションの作成
### 【Command (m for help):】でnを入力
Command (m for help): n
Partition type
   p   primary (0 primary, 0 extended, 4 free)
   e   extended (container for logical partitions)

### 【Select (default p):】でpを入力
Select (default p): p
Partition number (1-4, default 1): 1
First sector (2048-3907029167, default 2048):
Last sector, +sectors or +size{K,M,G,T,P} (2048-3907029167, default 3907029167):

Created a new partition 1 of type 'Linux' and of size 1.8 TiB.
2-4. ファイルシステムを変更
### 【Command (m for help):】でtを入力
Command (m for help): t
Selected partition 1

### 【Hex code (type L to list all codes):】でlを入力し、「Linux raid auto」を探す
Hex code (type L to list all codes): l

 0  Empty           24  NEC DOS         81  Minix / old Lin bf  Solaris
 1  FAT12           27  Hidden NTFS Win 82  Linux swap / So c1  DRDOS/sec (FAT-
 2  XENIX root      39  Plan 9          83  Linux           c4  DRDOS/sec (FAT-
 3  XENIX usr       3c  PartitionMagic  84  OS/2 hidden C:  c6  DRDOS/sec (FAT-
 4  FAT16 <32M      40  Venix 80286     85  Linux extended  c7  Syrinx
 5  Extended        41  PPC PReP Boot   86  NTFS volume set da  Non-FS data
 6  FAT16           42  SFS             87  NTFS volume set db  CP/M / CTOS / .
 7  HPFS/NTFS/exFAT 4d  QNX4.x          88  Linux plaintext de  Dell Utility
 8  AIX             4e  QNX4.x 2nd part 8e  Linux LVM       df  BootIt
 9  AIX bootable    4f  QNX4.x 3rd part 93  Amoeba          e1  DOS access
 a  OS/2 Boot Manag 50  OnTrack DM      94  Amoeba BBT      e3  DOS R/O
 b  W95 FAT32       51  OnTrack DM6 Aux 9f  BSD/OS          e4  SpeedStor
 c  W95 FAT32 (LBA) 52  CP/M            a0  IBM Thinkpad hi eb  BeOS fs
 e  W95 FAT16 (LBA) 53  OnTrack DM6 Aux a5  FreeBSD         ee  GPT
 f  W95 Ext'd (LBA) 54  OnTrackDM6      a6  OpenBSD         ef  EFI (FAT-12/16/
10  OPUS            55  EZ-Drive        a7  NeXTSTEP        f0  Linux/PA-RISC b
11  Hidden FAT12    56  Golden Bow      a8  Darwin UFS      f1  SpeedStor
12  Compaq diagnost 5c  Priam Edisk     a9  NetBSD          f4  SpeedStor
14  Hidden FAT16 <3 61  SpeedStor       ab  Darwin boot     f2  DOS secondary
16  Hidden FAT16    63  GNU HURD or Sys af  HFS / HFS+      fb  VMware VMFS
17  Hidden HPFS/NTF 64  Novell Netware  b7  BSDI fs         fc  VMware VMKCORE
18  AST SmartSleep  65  Novell Netware  b8  BSDI swap       fd  Linux raid auto
1b  Hidden W95 FAT3 70  DiskSecure Mult bb  Boot Wizard hid fe  LANstep
1c  Hidden W95 FAT3 75  PC/IX           be  Solaris boot    ff  BBT
1e  Hidden W95 FAT1 80  Old Minix

### 「Linux raid auto」はfdなので、fdを入力
Hex code (type L to list all codes): fd
Changed type of partition 'Linux' to 'Linux raid autodetect'.

### パーティションのレイアウトを保存するためwを入力
Command (m for help): w
The partition table has been altered.
Calling ioctl() to re-read partition table.
Syncing disks.
2-1~2-4までの作業を「/dev/sdb」にも実行する
実行後は以下のパーティションになった(disk –lで確認)
# disk –l
・
・
・
Disk /dev/sda: 1.8 TiB, 2000398934016 bytes, 3907029168 sectors
Units: sectors of 1 * 512 = 512 bytes
Sector size (logical/physical): 512 bytes / 512 bytes
I/O size (minimum/optimal): 512 bytes / 512 bytes
Disklabel type: dos
Disk identifier: 0x00050a08

Device     Boot Start        End    Sectors  Size Id Type
/dev/sda1        2048 3907029167 3907027120  1.8T fd Linux raid autodetect

Disk /dev/sdb: 1.8 TiB, 2000398934016 bytes, 3907029168 sectors
Units: sectors of 1 * 512 = 512 bytes
Sector size (logical/physical): 512 bytes / 512 bytes
I/O size (minimum/optimal): 512 bytes / 512 bytes
Disklabel type: dos
Disk identifier: 0x000ac0eb

Device     Boot Start        End    Sectors  Size Id Type
/dev/sdb1        2048 3907029167 3907027120  1.8T fd Linux raid autodetect
3. RAID 1 の構築
# apt-get install mdadm
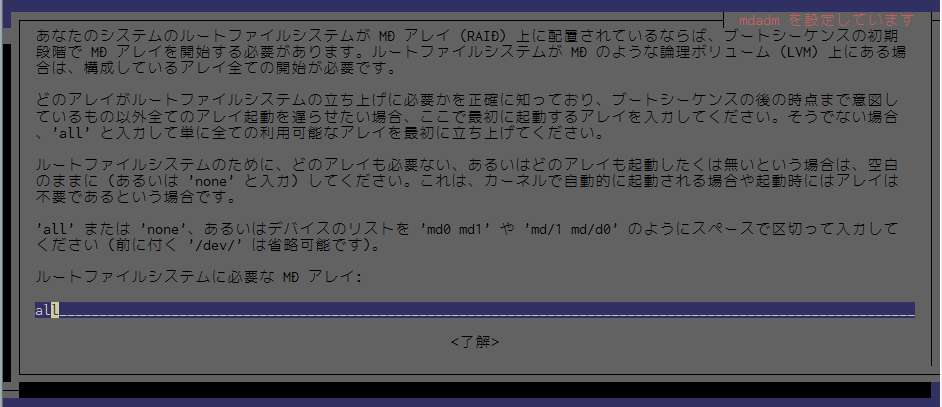
mdadmのインストール中に「ルートファイルシステム云々」って表示されたときは「all」を指定した

2台のHDDをディスクアレイ化し、デバイスファイル/dev/md0として作成する
# mdadm --create /dev/md0 --level=raid1 --raid-devices=2 /dev/sda1 /dev/sdb1

### 「Continue creating array?」と聞かれるので、yesと入力
Continue creating array? yes
mdadm: Defaulting to version 1.2 metadata
mdadm: array /dev/md0 started.
他のRAIDを構築する場合は、以下のコマンドオプションを確認する
mdadm --create --help | less
ここからRAID1の構成が開始され、以下のコマンドで進捗が確認できる
# cat /proc/mdstat
Personalities : [raid1]
md0 : active raid1 sdb1[1] sda1[0]
      1953382464 blocks super 1.2 [2/2] [UU]
      [>....................]  resync =  0.1% (2949760/1953382464) finish=1719.3min speed=18906K/sec
      bitmap: 15/15 pages [60KB], 65536KB chunk

unused devices: <none>
時間がかかるので、他の作業を続ける
再起動後も、構築したディスクアレイが/dev/md0としてアクセス出来るように設定ファイルに情報を追記する
# mdadm --detail --scan
ARRAY /dev/md0 metadata=1.2 name=raspberrypi:0 UUID=79ed4095:f0284ec6:809c84a6:af43a829

###上記のコマンド結果を/etc/mdadm/mdadm.confに追記する
# mdadm --detail --scan >> /etc/mdadm/mdadm.conf

### initramfsを更新。initramfsについてはこのサイトを参考https://www.suse.com/ja-jp/documentation/sles11/singlehtml/book_sle_admin/cha.boot.html
# update-initramfs -u
作成したディスクアレイをext4でフォーマット
# mkfs -t ext4 /dev/md0
4. ディスクアレイ(RAID 1)のマウント
マウントポイントを「/home/samba」にして、「/dev/md0」をマウントするようにする
# mkdir /home/samba
「/etc/fstab」を変更し、再起動後もマウントするようにする
/dev/md0 /home/samba ext4 defaults,nofail 0 0
現状の設定では、RaspberryPiを起動したときマウントが失敗し、その時はシングルユーザモードで起動する
マウントに失敗してもそのまま起動してほしいため、「nofail」を追加している
また、参考にしたサイトの別記事では以下の記載があった
単純に「rootdelay=10」をrootwait前に追記しただけです。
どうやらRaspberryPiの仕様(RaspberryPi 3に限るかどうかは不明ですが)でHDDの起動を待たなければOS起動時の自動マウントに失敗する、といううことのようです。
ということで、「/boot/cmdline.txt」に「rootdelay=10」を追記した
dwc_otg.lpm_enable=0 console=serial0,115200 console=tty1 root=/dev/mmcblk0p2 rootfstype=ext4 elevator=deadline fsck.repair=yes rootdelay=10 rootwait
5. sambaのインストール
sambaのインストールは以下のサイトを参考
Raspberry Piでファイルサーバ、Part1 Samba基本編 | ものづくりエクスペリメント
# apt-get install samba ufw
ファイアウォールの設定
# ufw allow 22
# ufw enable
# ufw allow 137/udp
# ufw allow 138/udp
# ufw allow 139/tcp
# ufw allow 445/tcp
# ufw reload
# ufw status
Status: active

To                         Action      From
--                         ------      ----
22                         ALLOW       Anywhere
137/udp                    ALLOW       Anywhere
138/udp                    ALLOW       Anywhere
139/tcp                    ALLOW       Anywhere
445/tcp                    ALLOW       Anywhere
22                         ALLOW       Anywhere (v6)
137/udp                    ALLOW       Anywhere (v6)
138/udp                    ALLOW       Anywhere (v6)
139/tcp                    ALLOW       Anywhere (v6)
445/tcp                    ALLOW       Anywhere (v6)
samba用のユーザを作成する
# useradd -M -s /usr/sbin/nologin samba
# pdbedit -a samba
sambaの設定を変更する
[global]

## Browsing/Identification ###

# Change this to the workgroup/NT-domain name your Samba server will part of
   workgroup = WORKGROUP
   dos charset = CP932
   unix charset = UTF-8
   dns proxy = no
   printing = bsd

#### Networking ####
   interfaces = 192.168.10. 127.0.0.0/8 eth0
   bind interfaces only = yes

# [home]、[printers]、[print$]はコメントアウトした

#追記
[public]
   comment = Public
   path = /home/samba
   writable = yes
   browsable = yes
   valid user = @samba
以下のコマンドでsambaの設定をテスト
# testparm
パーミッションの変更
# chown -R samba:samba samba/
次回起動時にSambaが自動起動するようにする
sambaの起動と、再起動後に自動起動するように設定する
# service smbd start
# service nmbd start
# systemctl enable smbd.service
# systemctl enable nmbd.service
6. 問題点
6-1. 起動時にsambaにアクセスできない
RaspberryPiを再起動すると、sambaのデーモンが起動しているのにWindowsからsambaにアクセスできない(Windowsのエクスプローラーにも表示されない)
何故かsambaを再起動するとアクセス出来るようになる
似たような現象に遭遇しているのを見つけた
ココではOSがFreeBSDなので、cronに起動直後に実行するコマンドを記載しているけど、(多分)RaspberryPiでは使用できないので「/etc/rc.local」に以下のコマンドを追記した
( /bin/sleep 10; /usr/sbin/service smbd restart ) &
やっていることは、バックグラウンドで10秒後にsambaを再起動するようにした
/etc/rc.localでバックグラウンドで実行して良いのか、「/bin/sleep 10;」コマンドをそもそも「/etc/rc.local」で実行して良いのかあまり調べていない
とりあえず、今のところはこれで問題ない感じ
6-2. ファイル転送が遅い
あとはRaspberryPiのネットワークのインターフェースせいか、ファイルの転送速度が遅い・・・(最大11MB/s)
USBの1000BASE-TをRaspberryPiに付ければ速度改善してくれるだろうか?
6-3. HDD・USBメモリを接続するとRAIDできない・・・かも
このブログ内に
再起動後も、構築したディスクアレイが/dev/md0としてアクセス出来るように設定ファイルに情報を追記する
と書いたけど、「/dev/sda」、「/dev/sdb」について何もしていない
気になったので調べてみると、やっぱりハマっている人がいるらしい
パーティションにラベルが付いているので、ラベルと「/dev/md0」で紐付けしているから問題ないのだろうか?
このあたりはHDDの構成が変わるときに再調査してみよう
CentOS6に最新のGitをインストールした話
CentOS6.8のデフォルトのgitを使用していたときに、「バージョンが古いので実行できない」的なことを言われた(何をしていたか忘れた・・・)
以下のサイトを参考にした。(ほぼ参考サイトと同じ内容)
まず、依存しているパッケージのインストール
# yum install curl-devel expat-devel gettext-devel openssl-devel perl-devel zlib-devel
公式ガイドでは上記のパッケージしか載っていないけれども、他の参考サイトを確認したところ、他にも「perl-ExtUtils-MakeMaker」というパッケージが必要らしい
自分の場合はいつの間にか入っていた
また、gitのヘルプも個人的に必要なので、ドキュメントの生成に必要なパッケージをインストール
# yum install asciidoc xmlto docbook2X
Fedora・RHEL・RHEL派生のディストリビューションは、バイナリの名前が異なっているため、以下のコマンドを実行
# ln -s /usr/bin/db2x_docbook2texi /usr/bin/docbook2x-texi
以下のサイトから、最新のgitのソースコードのアーカイブを選択
自分が見たときは「2.12.2」が最新
ソースコードのダウンロードからコンパイル、インストールのコマンドを実行
# cd /usr/local/src
# wget -O git-2.12.2.tar.gz https://github.com/git/git/archive/v2.12.2.tar.gz
# tar xvf git-2.12.2.tar.gz
# make configure
# ./configure --prefix=/usr
# make all doc info
# make install install-doc install-html install-info
gitがインストールされたかどうか確認
# git --version
git version 2.12.2